일기장 앱을 만드는 프로젝트를 예시로 들어보려고 한다.
프로젝트 구조는 다음과 같다
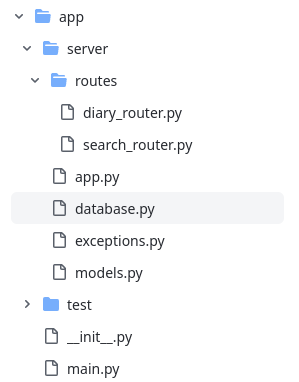
main.py : uvicorn 서버 실행 메소드가 담겨있는 메인 파일 , python3 app/main.py 로 실행하면 서버가 실행된다.
server 폴더
routes 폴더 : 라우터 파일들이 담겨있다. django의 urls.py 와 views.py 같은 느낌이라고 생각하면 될 것 같다
app.py : main.py 실행시 실행된다. FastAPI 앱 인스턴스 생성과 라우터 연결 등의 역할을 맡고 있다.
database.py : database와 연결된 부분을 관리한다. db에 정보를 저장하거나 불러오는 함수들을 가지고 있다.
exceptions.py : 예외처리 클래스들이 구현되어있다.
models.py : model 들이 구현되어있다. 응답양식, 데이터 모델 등등
자세한 코드를 알아보자
#main.py

import uvicorn

if __name__ == "__main__":
    uvicorn.run("server.app:app",host = "0.0.0.0", port = 8000, reload = True)
main.py 실행시 uvicorn을 이용해 app.py를 실행하는 서버를 띄운다.
#app.py

from fastapi import FastAPI, Request
from fastapi.responses import JSONResponse
from .routes import diary_router,search_router
from app.server.exceptions import APIException

app = FastAPI()
app.include_router(diary_router.router)
app.include_router(search_router.router)

@app.exception_handler(APIException)
async def api_exception_handler(request: Request, exc: APIException):
    return JSONResponse(
        status_code =  exc.status_code,
        content = exc.content
    )
app.py에선 FastAPI객체를 만들고 router를 추가한다.
예외처리 세팅도 여기서 한다.
#diary_router.py

from fastapi import APIRouter
from fastapi.encoders import jsonable_encoder
from app.server import database
from app.server.models import responseModel,Diary,UpdateDiary

router = APIRouter(prefix = "/diaries")

@router.get("",response_description="get all diaries")
async def get_all_diaries():
    response_message = "all diaries"
    diaries = await database.get_diaries()
    return responseModel(response_message, diaries)

@router.get("/{date}", response_description="read a diary")
async def get_a_diary(date: str):
    response_message = "read a diary"
    diary = await database.get_diary(date)
    return responseModel(response_message,diary)
/diaries 로 시작하는 url이 들어왔을때 app.py 에서 diary_router로 연결을 해준다.
diary_router에선 database.py의 db조회 함수를 사용해 db에서 일기장 정보들을 조회해 받아온다.
받아온 정보를 responseModel을 이용해 client에 반환한다.
#database.py

from motor import motor_asyncio
from .models import Diary
from app.server.exceptions import *

host = 'localhost'
port = 27017

#database settings
def get_db():
    client = motor_asyncio.AsyncIOMotorClient(host,port)
    db = client.iaryda
    return db

diary_collection = get_db().get_collection("diary")

#helpers
def diary_helper(diary) -> dict:
    diary.pop("_id")
    return diary

#db 조회, 관리 함수
async def get_diaries() -> list:
    result_data = []

    async for diary in diary_collection.find():
        result_data.append(diary_helper(diary))

    return result_data


async def get_diary(date: str) -> dict:
    diary = await diary_collection.find_one({"date" : date})
    if diary != None:
        return diary_helper(diary)
    else:
        raise DiaryDoseNotExistExecption()
database.py파일에서 db연결 및 조회 함수를 만들었다.
motor 를 이용해 몽고디비와 파이썬을 연결했다.
몽고디비에서 document를 저장할때 _id 항목을 생성해주는데
_id 항목은 굳이 client에 전달할 필요가 없으므로 _id를 제외해주는 diary_helper 함수를 만들어 사용했다.
오류가 발생하는 경우 exception 클래스를 이용해 오류 메세지를 전달한다.
#models.py

def responseModel(message, data) -> dict:
    if type(data) == list:
        return {
            "status" : 200,
            "message" : message,
            "data" : data
        }
    else:
        return {
            "status" : 200,
            "message" : message,
            "data" : [data]
        }
responseModel 함수는 models.py에 구현돼있다.
일정한 양식으로 응답을 할 수 있도록 해준다.
#exceptions.py

class StatusCode:
    HTTP_500 = 500
    HTTP_200 = 200

def make_error_content(message) -> dict:
    return {
        "status" : StatusCode.HTTP_500,
        "message" : message,
        "data" : []
    }

class APIException(Exception):
    status_code : int
    content: dict

class DiaryDoseNotExistExecption(APIException):
    def __init__(self,):
        self.status_code = StatusCode.HTTP_500
        self.content = make_error_content("Unvalid date. There is no diary in this date")
exceptions.py에선 오류 메세지 전달을 구현했다.
Exception객체를 상속하는 APIException 클래스를 먼저 만든 후 app.py에 exception_handler를 설정해준다.
그 이후 APIException 을 상속하는 exception 클래스들을 만든 후 사용하면 된다.
결론은 사용자에게서 요청이 오면
app.py -> router -> database -> router -> 응답 반환 순으로 이루어진다.
router 파일들을 좀 더 손볼 필요가 있을 것 같긴한데
일단 이렇게 만들어놨다.
'FastAPI' 카테고리의 다른 글
| 사지방에서 FastAPI 공부하기 #1 - 개발환경 설정 (0) | 2023.03.19 |
|---|